# 锋迷Wiki实战项目
# 一、关于Wiki
# 1.1、是什么
Wiki(多人协作的写作系统)是一种在网络上开放且可供多人协同创作的超文本系统,由美国人沃德·坎宁安于1995年首先开发,这种超文本系统支持面向社群的协作式写作,同时也包括一组支持这种写作。沃德·坎宁安将Wiki定义为一种允许一群用户用简单的描述来创建和连接一组网页的社会计算系统。Wiki站点由多人维护,每个人都可以发表自己的意见,或对共同的主题进行扩展与探讨。
# 1.2、与Blog的区别
Wiki站点的内容要求着高度相关性。最其确定的主旨,任何写作者和参与者都应当严肃地遵从。Wiki的协作是针对同一主题作外延式和内涵式的扩展,将同一个问题谈得很充分很深入。一般的Blog站点都会有一个主题,凡是这个主旨往往都是很松散的,而且一般不会去刻意地控制内容的相关性。
# 二、项目搭建
# 2.1、服务端
- 建库建表
- 创建SpringBoot项目
- 导入依赖
- 使用MyBatisX插件生成代码
# 2.1.1、建库建表
建库建表:关联关系  (一对一,一对多,多对多)   一对一和一对多可以设置外键,在多方设置外键

                                                                                         多对多设置关联表
数据库名
qfwiki
SET NAMES utf8mb4;
SET FOREIGN_KEY_CHECKS = 0;

-- ----------------------------
-- Table structure for category
-- ----------------------------
DROP TABLE IF EXISTS `category`;
CREATE TABLE `category`  (
  `id` bigint(20) NOT NULL COMMENT 'id',
  `parent` bigint(20) NOT NULL DEFAULT 0 COMMENT '父id',
  `name` varchar(50) CHARACTER SET utf8mb4 COLLATE utf8mb4_general_ci NOT NULL COMMENT '名称',
  `sort` int(11) NULL DEFAULT NULL COMMENT '顺序',
  PRIMARY KEY (`id`) USING BTREE
) ENGINE = InnoDB CHARACTER SET = utf8mb4 COLLATE = utf8mb4_general_ci COMMENT = '分类' ROW_FORMAT = DYNAMIC;

-- ----------------------------
-- Records of category
-- ----------------------------
INSERT INTO `category` VALUES (100, 0, '前端开发', 100);
INSERT INTO `category` VALUES (101, 100, 'Vue', 101);
INSERT INTO `category` VALUES (102, 100, 'HTML & CSS', 102);
INSERT INTO `category` VALUES (200, 0, 'Java', 200);
INSERT INTO `category` VALUES (201, 200, '基础应用', 201);
INSERT INTO `category` VALUES (202, 200, '框架应用', 202);
INSERT INTO `category` VALUES (300, 0, 'Python', 300);
INSERT INTO `category` VALUES (301, 300, '基础应用', 301);
INSERT INTO `category` VALUES (302, 300, '进阶方向应用', 302);
INSERT INTO `category` VALUES (400, 0, '数据库', 400);
INSERT INTO `category` VALUES (401, 400, 'MySQL', 401);
INSERT INTO `category` VALUES (500, 0, '其它', 500);
INSERT INTO `category` VALUES (501, 500, '服务器', 501);
INSERT INTO `category` VALUES (502, 500, '开发工具', 502);
INSERT INTO `category` VALUES (503, 500, '热门服务端语言', 503);

-- ----------------------------
-- Table structure for content
-- ----------------------------
DROP TABLE IF EXISTS `content`;
CREATE TABLE `content`  (
  `id` bigint(20) NOT NULL COMMENT '文档id',
  `content` mediumtext CHARACTER SET utf8mb4 COLLATE utf8mb4_general_ci NOT NULL COMMENT '内容',
  PRIMARY KEY (`id`) USING BTREE
) ENGINE = InnoDB CHARACTER SET = utf8mb4 COLLATE = utf8mb4_general_ci COMMENT = '文档内容' ROW_FORMAT = DYNAMIC;

-- ----------------------------
-- Records of content
-- ----------------------------

-- ----------------------------
-- Table structure for demo
-- ----------------------------
DROP TABLE IF EXISTS `demo`;
CREATE TABLE `demo`  (
  `id` bigint(20) NOT NULL COMMENT 'id',
  `name` varchar(50) CHARACTER SET utf8mb4 COLLATE utf8mb4_general_ci NULL DEFAULT NULL COMMENT '名称',
  PRIMARY KEY (`id`) USING BTREE
) ENGINE = InnoDB CHARACTER SET = utf8mb4 COLLATE = utf8mb4_general_ci COMMENT = '测试' ROW_FORMAT = DYNAMIC;

-- ----------------------------
-- Records of demo
-- ----------------------------
INSERT INTO `demo` VALUES (1, '测试');

-- ----------------------------
-- Table structure for doc
-- ----------------------------
DROP TABLE IF EXISTS `doc`;
CREATE TABLE `doc`  (
  `id` bigint(20) NOT NULL COMMENT 'id',
  `ebook_id` bigint(20) NOT NULL DEFAULT 0 COMMENT '电子书id',
  `parent` bigint(20) NOT NULL DEFAULT 0 COMMENT '父id',
  `name` varchar(50) CHARACTER SET utf8mb4 COLLATE utf8mb4_general_ci NOT NULL COMMENT '名称',
  `sort` int(11) NULL DEFAULT NULL COMMENT '顺序',
  `view_count` int(11) NULL DEFAULT 0 COMMENT '阅读数',
  `vote_count` int(11) NULL DEFAULT 0 COMMENT '点赞数',
  PRIMARY KEY (`id`) USING BTREE
) ENGINE = InnoDB CHARACTER SET = utf8mb4 COLLATE = utf8mb4_general_ci COMMENT = '文档' ROW_FORMAT = DYNAMIC;

-- ----------------------------
-- Records of doc
-- ----------------------------
INSERT INTO `doc` VALUES (1, 1, 0, '文档1', 1, 0, 0);
INSERT INTO `doc` VALUES (2, 1, 1, '文档1.1', 1, 0, 0);
INSERT INTO `doc` VALUES (3, 1, 0, '文档2', 2, 0, 0);
INSERT INTO `doc` VALUES (4, 1, 3, '文档2.1', 1, 0, 0);
INSERT INTO `doc` VALUES (5, 1, 3, '文档2.2', 2, 0, 0);
INSERT INTO `doc` VALUES (6, 1, 5, '文档2.2.1', 1, 0, 0);

-- ----------------------------
-- Table structure for ebook
-- ----------------------------
DROP TABLE IF EXISTS `ebook`;
CREATE TABLE `ebook`  (
  `id` bigint(20) NOT NULL COMMENT 'id',
  `name` varchar(50) CHARACTER SET utf8mb4 COLLATE utf8mb4_general_ci NULL DEFAULT NULL COMMENT '名称',
  `category1_id` bigint(20) NULL DEFAULT NULL COMMENT '分类1',
  `category2_id` bigint(20) NULL DEFAULT NULL COMMENT '分类2',
  `description` varchar(200) CHARACTER SET utf8mb4 COLLATE utf8mb4_general_ci NULL DEFAULT NULL COMMENT '描述',
  `cover` varchar(200) CHARACTER SET utf8mb4 COLLATE utf8mb4_general_ci NULL DEFAULT NULL COMMENT '封面',
  `doc_count` int(11) NOT NULL DEFAULT 0 COMMENT '文档数',
  `view_count` int(11) NOT NULL DEFAULT 0 COMMENT '阅读数',
  `vote_count` int(11) NOT NULL DEFAULT 0 COMMENT '点赞数',
  PRIMARY KEY (`id`) USING BTREE
) ENGINE = InnoDB CHARACTER SET = utf8mb4 COLLATE = utf8mb4_general_ci COMMENT = '电子书' ROW_FORMAT = DYNAMIC;

-- ----------------------------
-- Records of ebook
-- ----------------------------
INSERT INTO `ebook` VALUES (1, 'Spring Boot 入门教程', NULL, NULL, '零基础入门 Java 开发,企业级应用开发最佳首选框架', '/cover2.png', 6, 0, 0);
INSERT INTO `ebook` VALUES (2, 'Vue 入门教程', NULL, NULL, '零基础入门 Vue 开发,企业级应用开发最佳首选框架', '/cover1.png', 0, 0, 0);
INSERT INTO `ebook` VALUES (3, 'Python 入门教程', NULL, NULL, '零基础入门 Python 开发,企业级应用开发最佳首选框架', '/cover2.png', 0, 0, 0);
INSERT INTO `ebook` VALUES (4, 'Mysql 入门教程', NULL, NULL, '零基础入门 Mysql 开发,企业级应用开发最佳首选框架', '/cover2.png', 0, 0, 0);
INSERT INTO `ebook` VALUES (5, 'Oracle 入门教程', NULL, NULL, '零基础入门 Oracle 开发,企业级应用开发最佳首选框架', '/cover2.png', 0, 0, 0);

-- ----------------------------
-- Table structure for ebook_snapshot
-- ----------------------------
DROP TABLE IF EXISTS `ebook_snapshot`;
CREATE TABLE `ebook_snapshot`  (
  `id` bigint(20) NOT NULL AUTO_INCREMENT COMMENT 'id',
  `ebook_id` bigint(20) NOT NULL DEFAULT 0 COMMENT '电子书id',
  `date` date NOT NULL COMMENT '快照日期',
  `view_count` int(11) NOT NULL DEFAULT 0 COMMENT '阅读数',
  `vote_count` int(11) NOT NULL DEFAULT 0 COMMENT '点赞数',
  `view_increase` int(11) NOT NULL DEFAULT 0 COMMENT '阅读增长',
  `vote_increase` int(11) NOT NULL DEFAULT 0 COMMENT '点赞增长',
  PRIMARY KEY (`id`) USING BTREE,
  UNIQUE INDEX `ebook_id_date_unique`(`ebook_id`, `date`) USING BTREE
) ENGINE = InnoDB AUTO_INCREMENT = 1 CHARACTER SET = utf8mb4 COLLATE = utf8mb4_general_ci COMMENT = '电子书快照表' ROW_FORMAT = DYNAMIC;

-- ----------------------------
-- Records of ebook_snapshot
-- ----------------------------

-- ----------------------------
-- Table structure for test
-- ----------------------------
DROP TABLE IF EXISTS `test`;
CREATE TABLE `test`  (
  `id` bigint(20) NOT NULL AUTO_INCREMENT COMMENT 'id',
  `name` varchar(50) CHARACTER SET utf8mb4 COLLATE utf8mb4_general_ci NULL DEFAULT NULL COMMENT '名称',
  `password` varchar(50) CHARACTER SET utf8mb4 COLLATE utf8mb4_general_ci NULL DEFAULT NULL COMMENT '密码',
  PRIMARY KEY (`id`) USING BTREE
) ENGINE = InnoDB AUTO_INCREMENT = 4 CHARACTER SET = utf8mb4 COLLATE = utf8mb4_general_ci COMMENT = '测试' ROW_FORMAT = DYNAMIC;

-- ----------------------------
-- Records of test
-- ----------------------------
INSERT INTO `test` VALUES (1, '测试111', 'abc');
INSERT INTO `test` VALUES (2, 'tom', '123');
INSERT INTO `test` VALUES (3, 'bob', '456');

-- ----------------------------
-- Table structure for user
-- ----------------------------
DROP TABLE IF EXISTS `user`;
CREATE TABLE `user`  (
  `id` bigint(20) NOT NULL COMMENT 'ID',
  `login_name` varchar(50) CHARACTER SET utf8mb4 COLLATE utf8mb4_general_ci NOT NULL COMMENT '登陆名',
  `name` varchar(50) CHARACTER SET utf8mb4 COLLATE utf8mb4_general_ci NULL DEFAULT NULL COMMENT '昵称',
  `password` char(32) CHARACTER SET utf8mb4 COLLATE utf8mb4_general_ci NOT NULL COMMENT '密码',
  PRIMARY KEY (`id`) USING BTREE,
  UNIQUE INDEX `login_name_unique`(`login_name`) USING BTREE
) ENGINE = InnoDB CHARACTER SET = utf8mb4 COLLATE = utf8mb4_general_ci COMMENT = '用户' ROW_FORMAT = DYNAMIC;

-- ----------------------------
-- Records of user
-- ----------------------------
INSERT INTO `user` VALUES (1, 'test', '测试', 'e70e2222a9d67c4f2eae107533359aa4');

SET FOREIGN_KEY_CHECKS = 1;
2
3
4
5
6
7
8
9
10
11
12
13
14
15
16
17
18
19
20
21
22
23
24
25
26
27
28
29
30
31
32
33
34
35
36
37
38
39
40
41
42
43
44
45
46
47
48
49
50
51
52
53
54
55
56
57
58
59
60
61
62
63
64
65
66
67
68
69
70
71
72
73
74
75
76
77
78
79
80
81
82
83
84
85
86
87
88
89
90
91
92
93
94
95
96
97
98
99
100
101
102
103
104
105
106
107
108
109
110
111
112
113
114
115
116
117
118
119
120
121
122
123
124
125
126
127
128
129
130
131
132
133
134
135
136
137
138
139
140
141
142
143
144
145
146
147
148
149
150
151
152
153
154
155
156
157
158
159
160
161
162
163
164
165
166
167
168
169
170
171
# 2.1.2、项目依赖
<dependencies>
    <dependency>
        <groupId>org.springframework.boot</groupId>
        <artifactId>spring-boot-starter-web</artifactId>
    </dependency>
    <dependency>
        <groupId>com.baomidou</groupId>
        <artifactId>mybatis-plus-boot-starter</artifactId>
        <version>3.5.1</version>
    </dependency>
    <dependency>
        <groupId>mysql</groupId>
        <artifactId>mysql-connector-java</artifactId>
        <version>5.1.49</version>
        <scope>runtime</scope>
    </dependency>
    <dependency>
        <groupId>org.projectlombok</groupId>
        <artifactId>lombok</artifactId>
        <optional>true</optional>
    </dependency>
    <dependency>
        <groupId>org.springframework.boot</groupId>
        <artifactId>spring-boot-starter-test</artifactId>
        <scope>test</scope>
    </dependency>
    <!-- swagger2 -->
    <dependency>
        <groupId>io.springfox</groupId>
        <artifactId>springfox-swagger2</artifactId>
        <version>2.9.2</version>
    </dependency>
    <dependency>
        <groupId>io.springfox</groupId>
        <artifactId>springfox-swagger-ui</artifactId>
        <version>2.9.2</version>
    </dependency>
</dependencies>
2
3
4
5
6
7
8
9
10
11
12
13
14
15
16
17
18
19
20
21
22
23
24
25
26
27
28
29
30
31
32
33
34
35
36
37
38
# 2.1.3、使用MyBatisX插件生成代码
注意如何一次生成多张表的代码。
# 2.1.4、RespBean
import lombok.Data;

/**
 * 表示返回结果的bean
 */
@Data
public class RespBean {
    //状态码 10000-成功 10001-失败
    private Integer code;
    //返回的附件信息
    private String msg;
    //返回的数据
    private Object data;

    public static RespBean ok() {
        RespBean respBean = new RespBean();
        respBean.setCode(10000);

        return respBean;
    }

    public static RespBean ok(String msg) {
        RespBean respBean = new RespBean();
        respBean.setCode(10000);
        respBean.setMsg(msg);

        return respBean;
    }

    public static RespBean ok(String msg, Object data) {
        RespBean respBean = new RespBean();
        respBean.setCode(10000);
        respBean.setMsg(msg);
        respBean.setData(data);

        return respBean;
    }

    public static RespBean error() {
        RespBean respBean = new RespBean();
        respBean.setCode(10001);

        return respBean;
    }

    public static RespBean error(String msg) {
        RespBean respBean = new RespBean();
        respBean.setCode(10001);
        respBean.setMsg(msg);

        return respBean;
    }

    public static RespBean error(String msg, Object data) {
        RespBean respBean = new RespBean();
        respBean.setCode(10001);
        respBean.setMsg(msg);
        respBean.setData(data);

        return respBean;
    }
}
2
3
4
5
6
7
8
9
10
11
12
13
14
15
16
17
18
19
20
21
22
23
24
25
26
27
28
29
30
31
32
33
34
35
36
37
38
39
40
41
42
43
44
45
46
47
48
49
50
51
52
53
54
55
56
57
58
59
60
61
62
# 2.1.5、相关配置
application.properties
# 端口号
server.port=9999

# 配置连接池参数
spring.datasource.driver-class-name=com.mysql.jdbc.Driver
spring.datasource.url=jdbc:mysql://localhost:3306/qfwiki?useSSL=false
spring.datasource.username=root
spring.datasource.password=root

# mybatis配置
mybatis.type-aliases-package=com.qfedu.bean
#mybatis.mapper-locations=classpath:mapper/*Mapper.xml

# 日志
logging.level.com.qfedu.mapper=DEBUG
2
3
4
5
6
7
8
9
10
11
12
13
14
15
在启动类上添加如下注解
@MapperScan("com.qfedu.mapper")
MyBatisPlus分页插件配置
import com.baomidou.mybatisplus.annotation.DbType;
import com.baomidou.mybatisplus.extension.plugins.MybatisPlusInterceptor;
import com.baomidou.mybatisplus.extension.plugins.inner.PaginationInnerInterceptor;
import org.mybatis.spring.annotation.MapperScan;
import org.springframework.context.annotation.Bean;
import org.springframework.context.annotation.Configuration;

@Configuration
@MapperScan("com.qfedu.mapper")
public class MyBatisPlusConfig {
    //配置分页插件
    @Bean
    public MybatisPlusInterceptor mybatisPlusInterceptor() {
        MybatisPlusInterceptor interceptor = new MybatisPlusInterceptor();
        interceptor.addInnerInterceptor(new PaginationInnerInterceptor(DbType.MYSQL));
        return interceptor;
    }
}
2
3
4
5
6
7
8
9
10
11
12
13
14
15
16
17
18
Swagger2配置
import org.springframework.context.annotation.Bean;
import org.springframework.context.annotation.Configuration;
import org.springframework.core.env.Environment;
import springfox.documentation.builders.RequestHandlerSelectors;
import springfox.documentation.service.ApiInfo;
import springfox.documentation.service.Contact;
import springfox.documentation.spi.DocumentationType;
import springfox.documentation.spring.web.plugins.Docket;
import springfox.documentation.swagger2.annotations.EnableSwagger2;

import java.util.ArrayList;

@Configuration
@EnableSwagger2
public class Swagger2Config {
    //配置Swagger2
    @Bean
    public Docket docket(Environment environment) {
        return new Docket(DocumentationType.SWAGGER_2)
                .apiInfo(apiInfo())
                .select()
                .apis(RequestHandlerSelectors.basePackage("com.qfedu.controller"))
                .build();
    }

    //创建文档信息
    private ApiInfo apiInfo() {
        //联系方式
        Contact contact = new Contact("Solar",
                                      "https://note.codeaction.org",
                                      "solar@126.com");
        //文档信息
        ApiInfo apiInfo = new ApiInfo("Swagger2测试",
                "学习如何使用Swagger2",
                "10.0.0",
                "https://note.codeaction.org",
                contact,
                "Apache2.0",
                "https://note.codeaction.org", new ArrayList());
        return apiInfo;
    }
}
2
3
4
5
6
7
8
9
10
11
12
13
14
15
16
17
18
19
20
21
22
23
24
25
26
27
28
29
30
31
32
33
34
35
36
37
38
39
40
41
42
# 2.1.6、测试
- 使用
Junit测试Mapper和Service;- 使用
Swagger2测试Controller。
# 2.2、前端
注意:我们这里使用IDEA进行Vue开发,生成的前端项目和服务端项目在同一个目录下。
# 2.2.1、安装插件
在IDEA插件市场搜索
vue.js,安装,这样IDEA可以识别.vue代码。
# 2.2.2、生成前端项目
打开IDEA自带的控制台
$ vue create web
按照之前讲解的内容,选择相关选项,生成Vue的项目。
# 进入web目录,方便后续操作
$ cd web
2
# 2.2.3、安装并引入ant design of vue
安装
ant design of vue
# 安装特定版本ant design of vue,这样就无需手动修改package.json了
$ npm install --save ant-design-vue@1.7.8
2
在
main.js引入ant design of vue
import Antd from 'ant-design-vue';
import 'ant-design-vue/dist/antd.css';

Vue.use(Antd);
2
3
4
# 2.2.4、安装并引入Axios
安装
Axios
$ npm install axios
在
main.js引入Axios
import axios from 'axios'
Vue.prototype.$axios = axios
2
# 2.2.5、修改首页
- 修改页面为上左右下结构;
- 提取头部和尾部为组件;
- 首页以列表的形式显示所有的电子书。
# 2.2.6、配置Axios
配置Axios拦截器,方便跟踪请求和响应数据
//axios拦截器
axios.interceptors.request.use(config => {
  console.log("请求参数:", config);  //报文头部加一些cookie
  return config;
}, error => {
  console.log("返回错误:", error);
  return Promise.reject(error);
});
axios.interceptors.response.use(response => {
  console.log("返回结果:", response);
  return response;
}, error => {
  console.log("返回错误:", error);
  return Promise.reject(error);
})
2
3
4
5
6
7
8
9
10
11
12
13
14
15
# 2.2.7、前端多环境
# 2.2.7.1、配置
在web根目录分别定义如下文件
.env.dev,表示开发环境的配置文件- .env.sit 节点以sit开头
.env.prod,表示生产环境的配置文件
.env.dev内容如下
NODE_ENV=development
VUE_APP_SERVER=http://localhost:9001
2
.env.sit内容如下NODE_ENV=sittest VUE_APP_SERVER=http://localhost:9002
.env.prod内容如下
NODE_ENV=production
VUE_APP_SERVER=http://localhost:9003
2
package.json修改
#修改scripts内容如下
"scripts": {
    #使用开发环境配置启动项目,在80上启动项目,默认是8080
    #"dev": "vue-cli-service serve --port 80 --mode dev",
    "dev": "vue-cli-service serve  --mode dev"
    "sit": "vue-cli-service serve  --mode sit"
    #使用生产环境配置启动项目
    "prod": "vue-cli-service serve --mode prod",
    #使用开发环境配置打包项目
    "build:dev": "vue-cli-service build --mode dev",
    #使用生产环境配置打包项目
    "build:prod": "vue-cli-service build --mode prod"
}
2
3
4
5
6
7
8
9
10
11
12
13
以上就可以使用多环境启动和打包项目。
# 2.2.7.2、使用多环境相关参数
console.log(process.env.VUE_APP_SERVER);
我们可以利用此特性配置Axios的基本路径,以后使用Axios发送请求,直接写相对路径就可以了。如果Axios发送请求路径发生变化,直接修改配置文件就可以。
//配置axios的baseURL
axios.defaults.baseURL = process.env.VUE_APP_SERVER
2
# 2.3、Vue2中slot与slot-scope的理解及使用
事件有冒泡 ,this.$emit() 子传父 父传子 props
子传父:slot-scope
插槽分两类,默认插槽和具名插槽;通俗理解就是默认插槽是没有名称的插槽,具名插槽是有名称的插槽。
何时使用插槽?
简单的举个栗子:有2个组件,父组件father,子组件son。
父组件 father
这是父组件
子组件 son
这是子组件
一般我们的组件都会怎么写,但是这么写的话,会发现子组件中的实践slot是显示不出来的。如果需要让他显示出来,这时我们就可以用到插槽slot了。
如何使用插槽?
首先,子组件中我们要添加插槽slot,
这是子组件
此时slot的位置就会出现父组件中实践slot这几个大字。
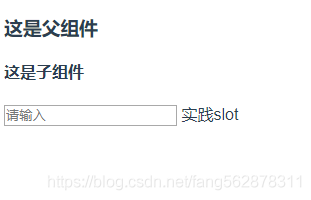
可以看到,这里面slot是没有名称的,顾名思义,这是插槽中的默认插槽。
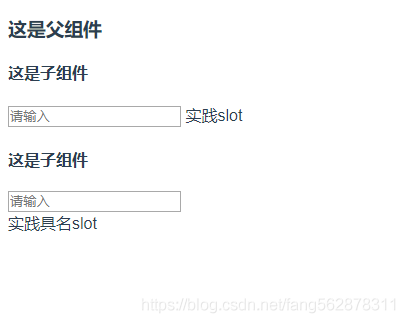
然后在看看具名插槽,直接上代码,一目了然,
父组件
这是父组件
子组件
这是子组件
可以看出,和默认插槽不同的是,在子组件中,我们给插槽一个name属性,这个就是插槽的名称,同时在父组件中,我们在需要将内容插入的地方标签上加了一个slot属性,他的值就是我们的slot 名称name。
上面就是2中插槽,默认插槽和具名插槽的用法。
下来是slot-scope。slot-scope是作用域插槽。
官网中有一句特别强调的话:父组件模板的所有东西都会在父级作用域内编译;子组件模板的所有东西都会在子级作用域内编译。简单的所,就是父组件中不能直接用自组件中定义的data数据。而slot-scope的出现就是解决了这样的问题。如下代码
父组件
这是父组件
子组件
这是子组件
首先先看下效果,
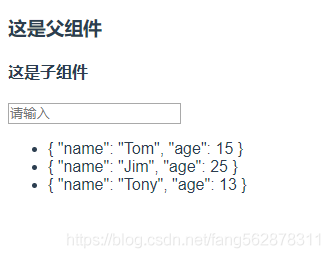
其中,下方三个对象的值,我们本身是在子组件中定义的,按照官方文档中说的,本来父组件中是无法显示出来这些数据的,但是为什么现在显示出来了呢?这就要归功于我们强大的slot-scope了。
首先,在子组件中的插槽上有一句data="list",而在父组件中也有slot-scope="scope",slot-scope就是取data的值,slot-scope的值是自定义的,我们可以取任何名称,但是data的值传过来时是以对象形式传输的,所以在这scope.data才是list的值。
这样我们就可以在父组件中取到子组件的值,并且加以应用了。
# 三、关于文件上传和显示处理
# 3.1、文件上传
# 3.1.1、前端
使用
a-upload实现上传注意:
name值和服务端接收参文件的参数名保持一致;action表示上传的路径;change表示上传文件改变时的状态处理,通常用于文件上传结束的处理。
# 3.1.2、服务端
import com.qfedu.bean.RespBean;
import org.springframework.beans.factory.annotation.Value;
import org.springframework.stereotype.Controller;
import org.springframework.util.FileCopyUtils;
import org.springframework.web.bind.annotation.*;
import org.springframework.web.multipart.MultipartFile;

import javax.servlet.ServletOutputStream;
import javax.servlet.http.HttpServletRequest;
import javax.servlet.http.HttpServletResponse;
import java.io.File;
import java.io.FileInputStream;
import java.io.IOException;
import java.util.UUID;

@CrossOrigin
@Controller
@RequestMapping("/file")
public class FileController {
    //存放封面的目录,在application.properties中配置
    @Value("${cover.dir}")
    private String coverdir;

    //文件上传到coverdir, 并将唯一的文件名返回
    @ResponseBody
    @PostMapping("/upload")
    public RespBean upload(@RequestParam("cover") MultipartFile cover) {
        if (cover.isEmpty()) {
            return RespBean.error("文件为空");
        }
        String fileName = cover.getOriginalFilename();

        fileName = UUID.randomUUID().toString().replace("-", "") + "_" + fileName;

        try {
            //文件上传
            cover.transferTo(new File(coverdir + fileName));
        } catch (IOException e) {
            e.printStackTrace();
            return RespBean.ok("上传失败");
        }

        return RespBean.ok("上传成功", fileName);
    }
}
2
3
4
5
6
7
8
9
10
11
12
13
14
15
16
17
18
19
20
21
22
23
24
25
26
27
28
29
30
31
32
33
34
35
36
37
38
39
40
41
42
43
44
45
# 3.2、图片显示
# 3.2.1、服务端
//前端读取该路径,显示文件
@RequestMapping("/showimage/{image_name}")
public void showImage(@PathVariable("image_name") String image_name,
                      HttpServletRequest req, HttpServletResponse resp)
    throws IOException {
    //设置响应信息


    ServletOutputStream out = resp.getOutputStream();
    File file = new File(coverdir + "/" + image_name);

    FileCopyUtils.copy(new FileInputStream(file), out);
    out.flush();
}
2
3
4
5
6
7
8
9
10
11
12
13
14
# 3.2.2、前端
# 显示封面的标签
<a-avatar shape="square" :size="64" :src="covertCoverPath(cover)" />

# 转换头像的地址
covertCoverPath(cover) {
return process.env.VUE_APP_SERVER + "/file/showimage/" + cover;
}
2
3
4
5
6
7
ES6中... (1)基础类型的属性 深拷贝
(2)对象类型 浅拷贝