# SpringIOC和DI
# 一、Spring概述
# 1.1、Spring是什么
Spring是分层的 Java SE/EE应用full-stack轻量级开源框架,以**IOC(**Inverse Of Control:反转控制)和 AOP(Aspect Oriented Programming:面向切面编程)为内核。
提供了表现层SpringMVC和持久层Spring JDBCTemplate以及业务层事务管理等众多的企业级应用技术,还能整合开源世界众多著名的第三方框架和类库,逐渐成为使用最多的Java EE 企业应用开源框架。
# 1.2、Spring发展历程(了解)
1997 年, IBM提出了EJB 的思想
1998 年,SUN制定开发标准规范 EJB1.0
1999 年,EJB1.1 发布
2001 年,EJB2.0 发布
2003 年,EJB2.1 发布
2006 年,EJB3.0 发布
Rod Johnson(Spring 之父)
Expert One-to-One J2EE Design and Development(2002)
- 阐述了 J2EE 使用EJB 开发设计的优点及解决方案
Expert One-to-One J2EE Development without EJB(2004)
- 阐述了 J2EE 开发不使用 EJB的解决方式(Spring 雏形)

# 1.3、Spring的优势
1) 方便解耦,简化开发 (IOC)
通过Spring提供的IOC容器,可以将对象间的依赖关系交由Spring进行控制,避免硬编码所造成的过度耦合。
用户也不必再为单例模式类、属性文件解析等这些很底层的需求编写代码,可以更专注于上层的应用。
2) AOP 编程的支持
通过Spring的AOP功能,方便进行面向切面编程,许多不容易用传统OOP实现的功能可以通过AOP轻松实现。
3) 声明式事务的支持 @Tranctional Serice层的实现类中的方法
可以将我们从单调烦闷的事务管理代码中解脱出来,通过声明式方式灵活的进行事务管理,提高开发效率和质量
4) 方便程序的测试
可以用非容器依赖的编程方式进行几乎所有的测试工作,测试不再是昂贵的操作,而是随手可做的事情。
# 1.4、Spring的体系结构
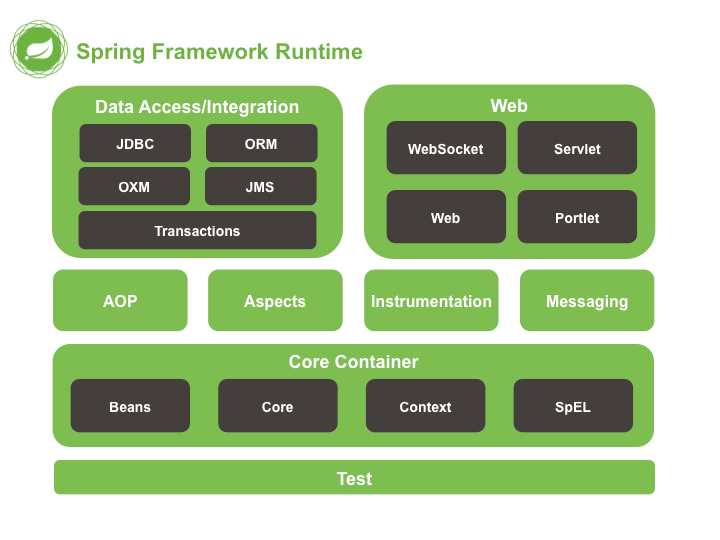
核心模块
Beans / Core / Context /SpEL
# 二、Spring快速入门 5.2.6.RELEASE
# 2.1、Spring程序开发步骤
新建Maven工程并添加相关依赖;
编写接口和实现类;
编写Spring核心配置文件;
编写测试类进行测试。
# 2.2、新建Maven工程并添加相关依赖
pom.xml中依赖如下:
<dependencies>
    <dependency>
        <groupId>org.springframework</groupId>
        <artifactId>spring-context</artifactId>
        <version>5.2.6.RELEASE</version>
    </dependency>
    <dependency>
        <groupId>org.springframework</groupId>
        <artifactId>spring-core</artifactId>
        <version>5.2.6.RELEASE</version>
    </dependency>

    <dependency>
        <groupId>org.springframework</groupId>
        <artifactId>spring-beans</artifactId>
        <version>5.2.6.RELEASE</version>
    </dependency>
    <dependency>
        <groupId>org.springframework</groupId>
        <artifactId>spring-expression</artifactId>
        <version>5.2.6.RELEASE</version>
    </dependency>
    <dependency>
        <groupId>junit</groupId>
        <artifactId>junit</artifactId>
        <version>4.13</version>
        <scope>test</scope>
    </dependency>
</dependencies>
2
3
4
5
6
7
8
9
10
11
12
13
14
15
16
17
18
19
20
21
22
23
24
25
26
27
28
29
# 2.3、编写接口和实现类
UserDao.java
public interface UserDao {
    void save();
}
2
3
UserDaoImpl.java
public class UserDaoImpl implements UserDao {
    @Override
    public void save() {
		System.out.println("save...");
    }
}
2
3
4
5
6
# 2.4、编写Spring核心配置文件
applicationContext.xml
<?xml version="1.0" encoding="UTF-8"?>
<beans xmlns="http://www.springframework.org/schema/beans"
       xmlns:xsi="http://www.w3.org/2001/XMLSchema-instance"
       xsi:schemaLocation="http://www.springframework.org/schema/beans
       http://www.springframework.org/schema/beans/spring-beans.xsd">
    <!--
		通过bean标签,创建相应类型的对象,并将创建的对象交给Spring容器进行管理
	-->
    <bean id="userDao" class="com.qfedu.dao.impl.UserDaoImpl" ></bean>

</beans>
2
3
4
5
6
7
8
9
10
11
# 2.5、编写测试类进行测试
public class MyTest {

    @Test
    public void test() {
        //加载配置文件,创建应用上下文对象
        ApplicationContext context = new ClassPathXmlApplicationContext("applicationContext.xml");
        //获取对象
        UserDao userDao = (UserDao) context.getBean("userDao");
        userDao.save();
    }
}
2
3
4
5
6
7
8
9
10
11
运行测试方法测试
# 三、Spring配置文件
# 3.1、Bean标签基本配置
作用:通过配置将对象的创建交给Spring容器进行管理。
默认情况下它调用的是类中的无参构造函数,如果没有无参构造函数则不能创建成功。
相关属性
- id:Bean实例在Spring容器中的唯一标识;
- class:Bean的全限定名称。
# 3.2、Bean标签范围配置 重要 面试
scope,指对象的作用范围,取值如下:
| 取值范围 | 说明 |
|---|---|
| singleton | 默认值,单例的 , |
| prototype | 多例的 |
| request | WEB项目中,Spring创建一个Bean的对象,将对象存入到request域中 |
| session | WEB项目中,Spring创建一个Bean的对象,将对象存入到session域中 |
| global session | WEB项目中,应用在Portlet环境,如果没有Portlet环境那么globalSession相当于session |
当scope的取值为singleton时
- Bean的实例化个数:1个
- Bean的实例化时机:当Spring核心文件被加载时,实例化配置的Bean实例 面试
- Bean的生命周期:
- 对象创建:当应用加载,创建容器时,对象就被创建了;
- 对象运行:只要容器在,对象一直活着;
- 对象销毁:当应用卸载,销毁容器时,对象就被销毁了。
当scope的取值为prototype时
- Bean的实例化个数:多个
- Bean的实例化时机:当调用getBean()方法时实例化Bean
- Bean的生命周期:
- 对象创建:当使用对象时,创建新的对象实例;
- 对象运行:只要对象在使用中,就一直活着;
- 对象销毁:当对象长时间不用时,被 Java 的垃圾回收器回收了。
# 3.3、Bean生命周期配置 了解
实例化:调用构造方法,创建一个对象
初始化:init
init-method:指定类中的初始化方法名称
destroy-method:指定类中销毁方法名称
# 3.4、Bean实例化三种方式 面试
# 3.4.1、使用无参构造方法实例化 常用 重点
根据默认无参构造方法来创建类对象,如果bean中没有默认无参构造函数,将会创建失败。
<bean id="userDao" class="com.qfedu.dao.impl.UserDaoImpl">
# 3.4.2、工厂静态方法实例化 面试 了解
创建静态工厂
public class StaticBeanFactory {
    public static UserDao getUserDaoImpl() {
        return new UserDaoImpl();
    }
}
2
3
4
5
在Spring配置文件中配置
<!-- 静态工厂初始化 -->
<bean id="userDao" class="com.qfedu.factory.StaticBeanFactory" factory-method="getUserDaoImpl"></bean>
2
测试
//演示通过静态工厂创建Bean
@Test
public void test1() {
    ApplicationContext context = new ClassPathXmlApplicationContext("applicationContext.xml");
    UserDao userDao = (UserDao) context.getBean("userDao");
    userDao.save();
}
2
3
4
5
6
7
# 3.4.3、工厂实例方法实例化 面试 了解
创建动态工厂
public class DynamicBeanFactory {
    public UserDao getUserDao() {
        return new UserDaoImpl();
    }
}
2
3
4
5
在Spring配置文件中配置
<bean id="factory" class="com.qfedu.factory.DynamicBeanFactory"></bean>
<bean id="userDao" factory-bean="factory" factory-method="getUserDao"></bean>
2
测试
//演示通过静态工厂创建Bean
@Test
public void test2() {
    ApplicationContext context = new ClassPathXmlApplicationContext("applicationContext.xml");
    UserDao userDao = (UserDao) context.getBean("userDao");
    userDao.save();
}
2
3
4
5
6
7
# 3.5、什么是依赖注入 DI
依赖注入:Dependency Injection ,指容器负责创建和维护对象之间的依赖关系,而不是通过对象本身负责自己的创建和解决自己的依赖。在当前类需要用到其他类的对象,由Spring为我们提供,我们只需要在配置中说明。
业务层和持久层的依赖关系,在使用 Spring 之后,就让 Spring 来维护了。
简单的说,就是坐等框架把持久层对象传入业务层,而不用我们自己去获取。
# 3.6、依赖注入方式
# 3.6.1、构造方法注入 面试 了解
- 创建接口UserService和实现类UserServiceImpl
public interface UserService {
    void save();
}

public class UserServiceImpl implements UserService {
    //这里一定要有该属性,我们最终的目的是让该属性关联一个UserDaoImpl的对象
    private UserDao userDao;

    public UserServiceImpl() {
    }

    //一定要有该有参的构造方法,通过该方法完成依赖注入
    public UserServiceImpl(UserDao userDao) {
        this.userDao = userDao;
    }
}
2
3
4
5
6
7
8
9
10
11
12
13
14
15
16
- 在Spring配置文件中配置
<bean id="userDao" class="com.qfedu.dao.impl.UserDaoImpl"></bean>

<bean id="userService" class="com.qfedu.service.impl.UserServiceImpl">
    <!-- 构造方法注入,通过ref将id为“userDao”的bean传递给了UserServiceImpl构造方法的userDao形参 -->
    <constructor-arg name="userDao" ref="userDao" />
</bean>
2
3
4
5
6
- 测试
@Test
public void test3() {
    ApplicationContext context = new ClassPathXmlApplicationContext("classpath:applicationContext.xml");
    UserService userService = (UserService)context.getBean("userService");
    userService.save();
}
2
3
4
5
6
# 3.6.2、set方法注入(重点)
- 在UserServiceImpl中添加set方法
public class UserServiceImpl implements UserService {
    private UserDao userDao;

    public void setUserDao(UserDao userDao) {
        this.userDao = userDao;
    }
}
2
3
4
5
6
7
- 在Spring配置文件中配置
<bean id="userService" class="UserServiceImpl">
    <!-- set方法注入 -->
    <property name="userDao" ref="userDao"></property>
</bean>
2
3
4
- 测试方法同上
# 3.6.3、p名称空间注入 面试 了解
p命名空间注入本质也是set方法注入,但比起上述的set方法注入更加方便,主要体现在配置文件中
- 引入P命名空间
xmlns:p="http://www.springframework.org/schema/p"
- 在Spring配置文件中配置
<!-- p名称空间注入 -->
<bean id="userService" class="com.qfedu.service.impl.UserServiceImpl" p:userDao-ref="userDao"/>
2
# 3.7、依赖注入其他类型
上面的案例,我们学习了如何注入引用类型的数据,除了引用数据类型,普通数据类型,集合数据类型也可以注入。
# 3.7.1、普通数据类型注入 了解
- 创建Department实体类
//表示部门的实体类
public class Department {
    private Integer id;//部门编号
    private String name;//部门名称
    private String desc;//部门描述

    //set、get方法
    //toString方法
}
2
3
4
5
6
7
8
9
- 在Spring配置文件中配置
<!--
	通过Spring的IOC容器创建Department类的对象,并为其属性注入值
	无参构造方法实例化
-->
<bean id="department" class="com.qfedu.entity.Department">
    <!-- set方法注入
		value:简单类型
	-->
    <property name="id" value="1" />
    <property name="name" value="研发部" />
    <property name="desc" value="项目研发" />
</bean>
2
3
4
5
6
7
8
9
10
11
12
- 测试
@Test
public void test6() {
    //解析配置文件 -- 创建对象 -- 对象交给Spring的IOC容器进行管理
    ApplicationContext context = new ClassPathXmlApplicationContext("applicationContext.xml");
    //获取Department的对象
    Department department = (Department)context.getBean("department");
    //打印对象
    System.out.println(department);
}
2
3
4
5
6
7
8
9
# 3.7.2、引用类型注入 了解
- 创建实体类Address
//表示地址的实体类
public class Address {
    private String province;//省
    private String city;//市
    private String county;//县
    private String street;//街道
    private String no;//门牌号

    //set、get
    //toString
}
2
3
4
5
6
7
8
9
10
11
- 在Department中增加Address类型的属性
//表示部门的实体类
public class Department {
    private Integer id;//部门编号
    private String name;//部门名称
    private String desc;//部门描述
    private Address address;//部门地址

    //set、get
    //toString
}
2
3
4
5
6
7
8
9
10
- 在Spring配置文件中配置
<bean id="address" class="com.qfedu.entity.Address">
    <property name="province" value="山东省" />
    <property name="city" value="青岛市" />
    <property name="county" value="市北区" />
    <property name="street" value="龙城路" />
    <property name="no" value="31号" />
</bean>

<!--
	通过Spring的IOC容器创建Department类的对象,并为其属性注入值
	无参构造方法实例化
-->
<bean id="department" class="com.qfedu.entity.Department">
    <!-- set方法注入
		value:简单类型
	-->
    <property name="id" value="1" />
    <property name="name" value="研发部" />
    <property name="desc" value="项目研发" />
    <!-- set方法注入
		ref:引用类型
	-->
    <property name="address" ref="address" />
</bean>
2
3
4
5
6
7
8
9
10
11
12
13
14
15
16
17
18
19
20
21
22
23
24
- 测试同上
# 3.7.3、集合数据类型(List<String>)的注入 了解
- 创建Employee实体类
//表示员工的实体类
public class Employee {
    private Integer id;//员工编号
    private String name;//姓名
    private Integer age;//年龄
    private String gender;//性别
    private List<String> hobby;//爱好

    //set、get方法
    //toString方法
}
2
3
4
5
6
7
8
9
10
11
- 在Spring配置文件中配置
<!--
	通过Spring的IOC容器创建Employee类的对象,并为其属性注入值
	无参构造方法实例化
-->
<bean id="e1" class="com.qfedu.entity.Employee">
    <property name="id" value="1" />
    <property name="name" value="zs" />
    <property name="age" value="30" />
    <property name="gender" value="男" />
    <!--
		集合类型注入
	-->
    <property name="hobby">
        <list>
            <value>学习1</value>
            <value>学习2</value>
            <value>学习3</value>
        </list>
    </property>
</bean>
2
3
4
5
6
7
8
9
10
11
12
13
14
15
16
17
18
19
20
- 测试
@Test
public void test7() {
    //解析配置文件 -- 创建对象 -- 对象交给Spring的IOC容器进行管理
    ApplicationContext context = new ClassPathXmlApplicationContext("applicationContext.xml");
    //获取Employee的对象
    Employee employee = (Employee)context.getBean("e1");
    //打印对象
    System.out.println(employee);
}
2
3
4
5
6
7
8
9
# 3.7.4、集合数据类型(List<Employee>)的注入 了解
- 修改Department实体类
//表示部门的实体类
public class Department {
    private Integer id;//部门编号
    private String name;//部门名称
    private String desc;//部门描述
    private Address address;//部门地址
    private List<Employee> emps;//普通员工

    //set、get方法
    //toString方法
}
2
3
4
5
6
7
8
9
10
11
- 在Spring配置文件中配置
<bean id="e1" class="com.qfedu.entity.Employee">
    <property name="id" value="1" />
    <property name="name" value="zs" />
    <property name="age" value="30" />
    <property name="gender" value="男" />
    <!--
            集合类型注入
         -->
    <property name="hobby">
        <list>
            <value>学习1</value>
            <value>学习2</value>
            <value>学习3</value>
        </list>
    </property>
</bean>

<bean id="e2" class="com.qfedu.entity.Employee">
    <property name="id" value="1" />
    <property name="name" value="ls" />
    <property name="age" value="31" />
    <property name="gender" value="男" />
    <!--
            集合类型注入
         -->
    <property name="hobby">
        <list>
            <value>爬山</value>
            <value>游泳</value>
            <value>网游</value>
        </list>
    </property>
</bean>
<bean id="department" class="com.qfedu.entity.Department">
    <!-- set方法注入
            value:简单类型
        -->
    <property name="id" value="1" />
    <property name="name" value="研发部" />
    <property name="desc" value="项目研发" />
    <!-- set方法注入
            ref:引用类型
         -->
    <property name="address" ref="address" />
    <property name="emps">
        <list>
            <ref bean="e1" />
            <ref bean="e2" />
        </list>
    </property>
</bean>
2
3
4
5
6
7
8
9
10
11
12
13
14
15
16
17
18
19
20
21
22
23
24
25
26
27
28
29
30
31
32
33
34
35
36
37
38
39
40
41
42
43
44
45
46
47
48
49
50
51
- 测试同3.7.1。
# 3.7.5、集合数据类型(Map<String, User>)的注入 了解
- 修改Department,添加属性
//表示部门的实体类
public class Department {
    private Integer id;//部门编号
    private String name;//部门名称
    private String desc;//部门描述
    private Address address;//部门地址
    private Map<String, Employee> leader;//部门主管
    private List<Employee> emps;//普通员工
    //set、get
    //toString
}
2
3
4
5
6
7
8
9
10
11
- 在Spring配置文件中配置
<bean id="e1" class="com.qfedu.entity.Employee">
    <property name="id" value="1" />
    <property name="name" value="zs" />
    <property name="age" value="30" />
    <property name="gender" value="男" />
    <!--
            集合类型注入
         -->
    <property name="hobby">
        <list>
            <value>学习1</value>
            <value>学习2</value>
            <value>学习3</value>
        </list>
    </property>
</bean>

<bean id="e2" class="com.qfedu.entity.Employee">
    <property name="id" value="1" />
    <property name="name" value="ls" />
    <property name="age" value="31" />
    <property name="gender" value="男" />
    <!--
            集合类型注入
         -->
    <property name="hobby">
        <list>
            <value>爬山</value>
            <value>游泳</value>
            <value>网游</value>
        </list>
    </property>
</bean>

<bean id="e3" class="com.qfedu.entity.Employee">
    <property name="id" value="1" />
    <property name="name" value="ww" />
    <property name="age" value="40" />
    <property name="gender" value="男" />
    <!--
            集合类型注入
         -->
    <property name="hobby">
        <list>
            <value>爬山</value>
            <value>游泳</value>
            <value>网游</value>
        </list>
    </property>
</bean>

<bean id="e4" class="com.qfedu.entity.Employee">
    <property name="id" value="1" />
    <property name="name" value="zl" />
    <property name="age" value="41" />
    <property name="gender" value="男" />
    <!--
            集合类型注入
         -->
    <property name="hobby">
        <list>
            <value>爬山</value>
            <value>游泳</value>
            <value>网游</value>
        </list>
    </property>
</bean>

<bean id="department" class="com.qfedu.entity.Department">
    <!-- set方法注入
            value:简单类型
        -->
    <property name="id" value="1" />
    <property name="name" value="研发部" />
    <property name="desc" value="项目研发" />
    <!-- set方法注入
            ref:引用类型
         -->
    <property name="address" ref="address" />
    <property name="emps">
        <list>
            <ref bean="e1" />
            <ref bean="e2" />
        </list>
    </property>
    <property name="leader">
        <map>
            <entry key="CEO" value-ref="e3" />
            <entry key="CTO" value-ref="e4" />
        </map>
    </property>
</bean>
2
3
4
5
6
7
8
9
10
11
12
13
14
15
16
17
18
19
20
21
22
23
24
25
26
27
28
29
30
31
32
33
34
35
36
37
38
39
40
41
42
43
44
45
46
47
48
49
50
51
52
53
54
55
56
57
58
59
60
61
62
63
64
65
66
67
68
69
70
71
72
73
74
75
76
77
78
79
80
81
82
83
84
85
86
87
88
89
90
91
92
- 测试同上
# 3.7.6、集合数据类型(Properties)的注入 重要
- 创建实体类JdbcConfig,添加Properties
package com.qfedu.entity;

import java.util.Properties;

public class JdbcConfig {
    private Properties config;

    public Properties getConfig() {
        return config;
    }

    public void setConfig(Properties config) {
        this.config = config;
    }

    @Override
    public String toString() {
        return "JdbcConfig{" +
                "config=" + config +
                '}';
    }
}
2
3
4
5
6
7
8
9
10
11
12
13
14
15
16
17
18
19
20
21
22
- 在Spring配置文件中配置
<bean id="jdbcConfig" class="com.qfedu.entity.JdbcConfig">
    <!-- Properties类型的注入 -->
    <property name="config">
        <props>
            <prop key="driverName">com.mysql.jdbc.Driver</prop>
            <prop key="url">jdbc:mysql://localhost:3306/test</prop>
            <prop key="username">root</prop>
            <prop key="password">root</prop>
        </props>
    </property>
</bean>
2
3
4
5
6
7
8
9
10
11
- 测试
@Test
public void test8() {
    //解析配置文件 -- 创建对象 -- 对象交给Spring的IOC容器进行管理
    ApplicationContext context = new ClassPathXmlApplicationContext("applicationContext.xml");
    //获取Employee的对象
    JdbcConfig config = (JdbcConfig)context.getBean("jdbcConfig");
    //打印对象
    System.out.println(config);
}
2
3
4
5
6
7
8
9
# 3.8、引入其他配置文件
实际开发中,Spring的配置内容非常多,这就导致Spring配置很繁杂且体积很大,所以,可以将部分配置拆解到其他配置文件中,而在Spring主配置文件通过import标签进行加载。
<import resource="applicationContext-xxx.xml"/>
# 四、案例-Spring配置数据源 重点
# 4.1、数据源(连接池)的作用
提高程序性能,事先在连接池中创建连接,使用连接资源时从数据源中获取,使用完毕后将连接归还到连接池。
常见的数据源:C3P0,DBCP,Druid等。
案例目的:通过Spring管理连接池对象,并为连接池设置参数
# 4.2、数据源的手动创建
# 4.2.1、使用步骤
创建Maven工程并导入依赖
新建数据源对象
设置数据源的基本参数
使用数据源获取连接和归还资源
# 4.2.2、创建Maven工程并导入依赖
pom.xml
<?xml version="1.0" encoding="UTF-8"?>
<project xmlns="http://maven.apache.org/POM/4.0.0"
         xmlns:xsi="http://www.w3.org/2001/XMLSchema-instance"
         xsi:schemaLocation="http://maven.apache.org/POM/4.0.0 http://maven.apache.org/xsd/maven-4.0.0.xsd">
    <modelVersion>4.0.0</modelVersion>

    <groupId>com.qfedu</groupId>
    <artifactId>01_spring_ioc_di_demo</artifactId>
    <version>1.0.0</version>

    <dependencies>
        <dependency>
            <groupId>org.springframework</groupId>
            <artifactId>spring-context</artifactId>
            <version>5.2.6.RELEASE</version>
        </dependency>
        <dependency>
          <groupId>org.springframework</groupId>
          <artifactId>spring-core</artifactId>
          <version>5.2.6.RELEASE</version>
        </dependency>
        <dependency>
          <groupId>org.springframework</groupId>
          <artifactId>spring-beans</artifactId>
          <version>5.2.6.RELEASE</version>
        </dependency>
        <dependency>
          <groupId>org.springframework</groupId>
          <artifactId>spring-expression</artifactId>
          <version>5.2.6.RELEASE</version>
        </dependency>
        <dependency>
            <groupId>junit</groupId>
            <artifactId>junit</artifactId>
            <version>4.13</version>
            <scope>test</scope>
        </dependency>
        <dependency>
            <groupId>mysql</groupId>
            <artifactId>mysql-connector-java</artifactId>
            <version>5.1.47</version>
        </dependency>
        <dependency>
            <groupId>com.alibaba</groupId>
            <artifactId>druid</artifactId>
            <version>1.2.4</version>
        </dependency>
    </dependencies>
</project>
2
3
4
5
6
7
8
9
10
11
12
13
14
15
16
17
18
19
20
21
22
23
24
25
26
27
28
29
30
31
32
33
34
35
36
37
38
39
40
41
42
43
44
45
46
47
48
49
# 4.2.3、创建数据源相关代码
@Test
public void test1() throws PropertyVetoException, SQLException {
    //创建数据源
    DruidDataSource dataSource = new DruidDataSource();

    //设置连接参数
    dataSource.setDriverClassName("com.mysql.jdbc.Driver");
    dataSource.setUrl("jdbc:mysql://localhost:3306/test?useSSL=false");
    dataSource.setUsername("root");
    dataSource.setPassword("root");

    //获取连接
    Connection connection = dataSource.getConnection();
    System.out.println(connection.getClass().getName());
    //关闭连接
    connection.close();
}
2
3
4
5
6
7
8
9
10
11
12
13
14
15
16
17
存在的问题:
使用new的方式创建连接池对象,真正使用时耦合度太大;
连接池相关参数在代码中写死,硬编码,如果需要修改时,修改完需要重新编译,不利于后期维护。
如何解决:
使用Spring管理连接池对象的创建;
在Spring配置文件中配置连接池相关参数。
# 4.3、Spring配置数据源 重要
DataSource有无参构造方法,而Spring默认就是通过无参构造方法实例化对象的;
DataSource要想使用需要通过set方法设置数据库连接信息,而Spring可以通过Set方法进行字符串注入。
# 4.3.1、在Spring配置文件中配置
<?xml version="1.0" encoding="UTF-8"?>
<beans xmlns="http://www.springframework.org/schema/beans"
       xmlns:xsi="http://www.w3.org/2001/XMLSchema-instance"
       xsi:schemaLocation="http://www.springframework.org/schema/beans http://www.springframework.org/schema/beans/spring-beans.xsd">
    <!-- 通过bean标签,创建相应类型的对象,并将创建的对象交给Spring容器进行管理 -->
    <bean id="dataSource" class="com.alibaba.druid.pool.DruidDataSource">
        <!-- set方法注入 -->
        <property name="driverClassName" value="com.mysql.jdbc.Driver" />
        <property name="Url" value="jdbc:mysql://localhost:3306/mybatistest?useSSL=false&useUnicode=true&characterEncoding=utf-8" />
        <property name="username" value="root" />
        <property name="password" value="root" />
    </bean>
</beans>
2
3
4
5
6
7
8
9
10
11
12
13
# 4.3.2、测试
    /**
     * 从Spring IOC容器中获取连接池对象并进行测试
     */
    @Test
    public void test2() throws SQLException {
        ClassPathXmlApplicationContext context = new ClassPathXmlApplicationContext("applicationContext.xml");
        DataSource dataSource = (DataSource)context.getBean("dataSource");
        System.out.println(dataSource);
        Connection connection = dataSource.getConnection();
        System.out.println(connection);

        connection.close();
    }
2
3
4
5
6
7
8
9
10
11
12
13
# 4.4、抽取JDBC配置文件
一般在项目中,我们把jdbc的配置单独放在一个properties配置文件当中,然后在Spring配置文件中引入这个配置。
# 4.4.1、编写jdbc.properties
jdbc.driver=com.mysql.jdbc.Driver
jdbc.url=jdbc:mysql://localhost:3306/mybatistest?useSSL=false&useUnicode=true&characterEncoding=utf-8
jdbc.username=root
jdbc.password=root
2
3
4
# 4.4.2、在Spring配置文件中配置
这里需要注意文件开始的约束。
<?xml version="1.0" encoding="UTF-8"?>
<beans xmlns="http://www.springframework.org/schema/beans"
       xmlns:context="http://www.springframework.org/schema/context"
       xmlns:xsi="http://www.w3.org/2001/XMLSchema-instance"
       xsi:schemaLocation="http://www.springframework.org/schema/beans
            http://www.springframework.org/schema/beans/spring-beans.xsd
            http://www.springframework.org/schema/context
            http://www.springframework.org/schema/context/spring-context.xsd">
    <!-- 加载jdbc配置文件
        使用context标签,一定要引用相关约束
    -->
    <context:property-placeholder location="classpath:jdbc.properties" />

    <!--
        通过bean标签让Spring IOC容器创建对象
     -->
    <bean id="dataSource" class="com.alibaba.druid.pool.DruidDataSource">
        <!-- 设置四大参数
            set方法的方式注入
         -->
        <property name="driverClassName" value="${jdbc.driver}" />
        <property name="url" value="${jdbc.url}" />
        <property name="username" value="${jdbc.username}" />
        <property name="password" value="${jdbc.password}" />
    </bean>
</beans>
2
3
4
5
6
7
8
9
10
11
12
13
14
15
16
17
18
19
20
21
22
23
24
25
26